User Management

You can provide users with various access permissions based on the roles that they perform with the CloudSpend account. Following are the CloudSpend user roles that can be assigned to a particular user:

  • Cost Administrator: Has full access including the permissions to add, modify or delete AWS accounts, business units, budgets, and users. But when an existing user is promoted to a Cost Administrator role, it gives all the privileges of an administrator except the one to add new users.
    For the first time, the Site24x7 User role must be Super Admin to access the CloudSpend console, add new users, or provide role-based access to other users. When the Site24x7 User role is Admin, all the said privileges will be restricted for the first time.
  • Cost User: Has only read-only access.
  • Alert Contact: This user will not have access to the CloudSpend web client/API. However, the users assigned this role are limited to CloudSpend email alerts if they're part of an alert group associated with a cost account in Cloudspend.
  • Custom Role: Assign roles with read, write, or delete access for specific CloudSpend modules, ensuring precise user permissions and enhanced security.

Interpreting the User Management dashboard

To view the User Management dashboard,

  1. Login to CloudSpend.
  2. Navigate to Admin General.
  3. Select User Management.

You can view the list of available users and user groups from this dashboard. The User Management section displays the following details:

  • OrgName: The organization name.
  • OrgAdmin: The organization admin's email ID.If you wish to change your user role or need any access level permissions, please contact the OrgAdmin.

If you are assigned the User role, you will have read-only access to the User Management dashboard. 

Users

To add a new user:

  1. Go to Admin > User Management >Users dashboard, click Add User.
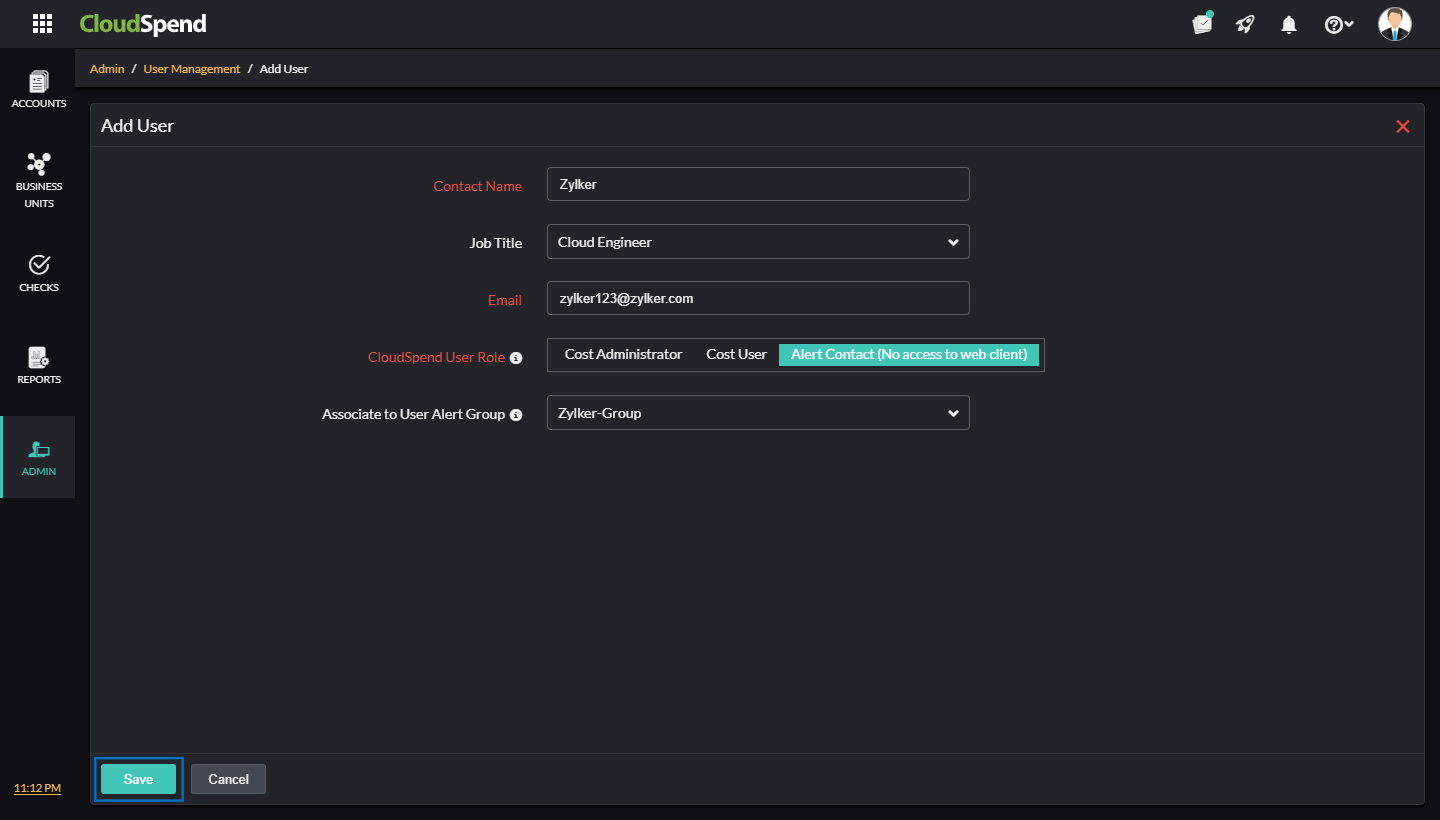
  2. In the Add User page, enter the following details:
    • Contact Name: The user's contact name.
    • Job Title: The job title of the user.
    • Email: The contact email ID of the user.
    • CloudSpend User Role: Select the applicable user role. The available options are Cost Administrator, Cost User, and Alert Contact.
    • Associate to User Alert Group: Select the applicable user alert group and click Apply.
      Add User Details
  3. Click Save.

After an email verification, the user will become a part of the confirmed users. Note that an user email address can't assume multiple roles within Site24x7.

To edit user details:

  1. Click the hamburger icon next to the applicable user display name.
  2. Click Edit.
  3. Update the applicable details in the Add User page.
  4. Click Save.

To delete a user:

  1. Click the hamburger icon next to the applicable user group display name.
  2. Click Delete.

User Groups

To add a new user group:

  1. Go to Admin > User Management > User Groups dashboard, click Add User Group.
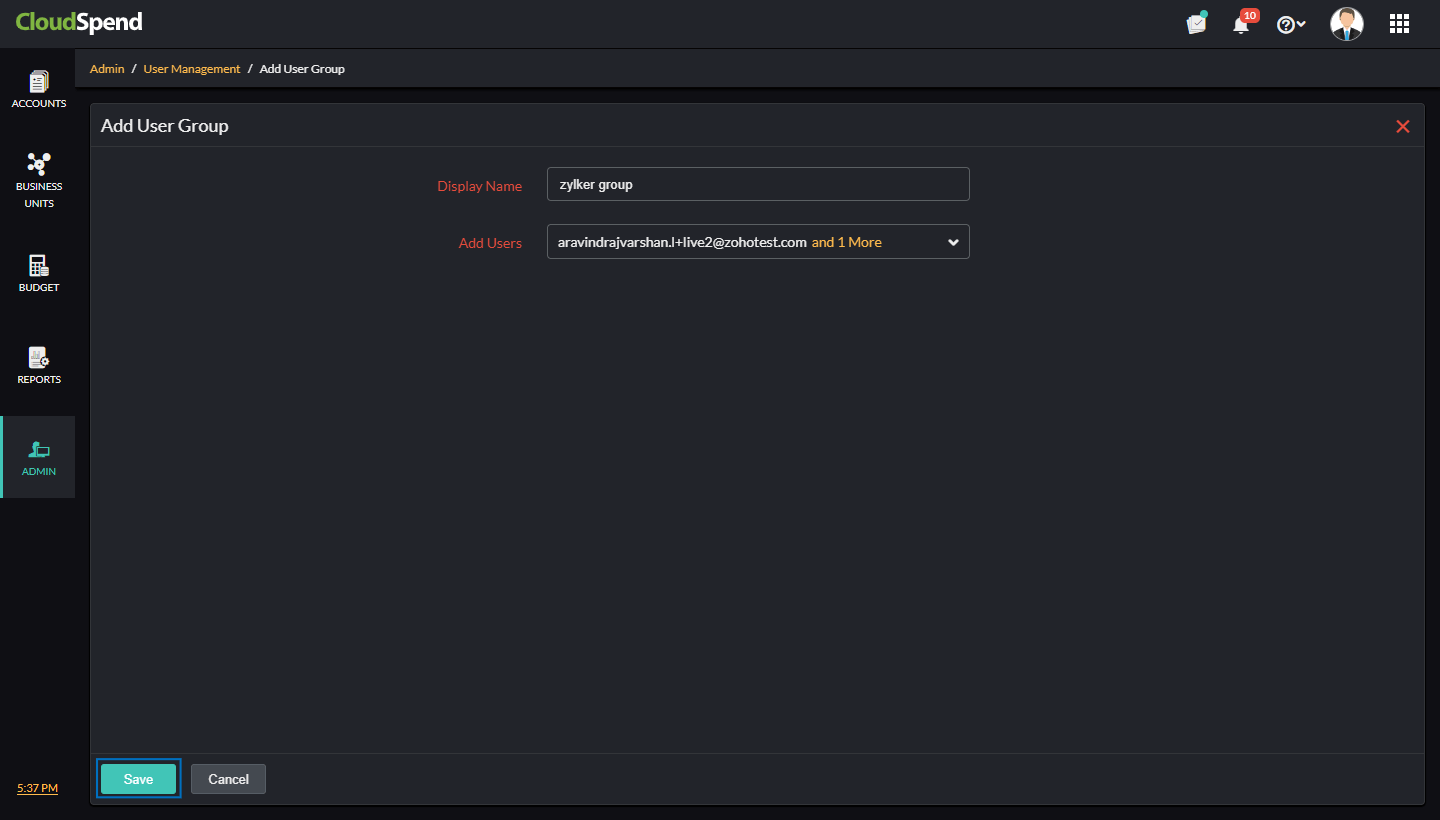
  2. In the Add User Group page, enter the following details:
    • Display Name: The user group's display name.
    • Add Users: Select the applicable users to be added to the user group and click Apply.
      Add User Group Details
  3. Click Save.

You can use these Cloudspend user groups in the Add Budget Notification Settings page during budget configuration for your cost account.

To edit user group details:

  1. Click the hamburger icon next to the applicable user group display name.
  2. Click Edit.
  3. Update the applicable details in the Add User Group page.
  4. Click Save.

To delete a user group:

  1. Click the hamburger icon next to the applicable user group display name.
  2. Click Delete.

Roles

CloudSpend’s Role-Based Access Control (RBAC) enables organizations to define and manage user permissions efficiently. With RBAC, admins can assign specific access levels to users based on their roles, ensuring that only authorized personnel can read, write, or delete cost-related data.

Benefits of RBAC

You can leverage the following benefits with RBAC:

  • Enhanced security: Restrict access to cloud financial data, reducing the risk of unauthorized modifications and ensuring compliance.
  • Granular permissions: Assign read, write, and delete permissions to different modules, in visual or JSON formats.
  • Custom role: Create roles that align with your organizational hierarchy and workflows for seamless collaboration.
  • Improved cost management: Prevent unauthorized changes to budgets, anomaly checks, and reports while ensuring team members have the necessary access.

Use cases

To get a better understanding of how the role-based permissions work, let's see a few scenarios:

Scenario 1

In a large organization, the finance team is responsible for monitoring budget reports and analyzing spending trends. However, to maintain data integrity, they should not be able to modify or delete cost-related data. To achieve this, the cost administrator creates a custom role called Finance Viewer and assigns read-only access to the Budget Checks and Reports modules. This allows the finance team to view and analyze budget reports without making any changes, ensuring accurate financial oversight while preventing unauthorized modifications.

Scenario 2

The IT operations team in an organization needs to track and address cost anomalies but does not require access to budget configurations or administrative settings. The cost admin sets up a custom role named Anomaly Manager, granting read and write permissions for Anomaly Checks while restricting access to the Budget Checks and Admin modules. This ensures that the IT team can monitor anomalies, update findings, and take necessary actions without interfering with budget policies or other critical financial settings.

Scenario 3

During a major cloud outage, the IT admin needs emergency access to adjust budgets, bypass anomaly blocks, and delete misconfigured cost rules. The cost admin assigns them a Super Admin custom role with read, write, and delete permissions across all modules. The IT admin quickly disables strict spending thresholds to restore services, then deletes outdated rules causing false alerts. After resolution, the admin can revoke the role to reinstate least-privilege access.

The RBAC feature enables organizations to assign precise access levels, ensuring security, compliance, and efficient cost management.

Adding a role

To add a new custom role:

  1. Navigate to User Management > Roles, and click Add Role.
  2. In the Add Roles page, enter the Role Name and Role Description.
  3. Select the desired modules and the applicable permissions. Alternatively, you can toggle to the JSON option to add the desired permissions to the custom role.
  4. Review the Permission Preview panel to verify access settings.
  5. Click Save to add the role. You can view the role you added on the Roles page.

When you add the desired permissions for the custom role in JSON format, ensure that you follow the below syntax:

[
{
"module_name": "<enter the required module name>",
"permissions": [
"Read",
"Write",
"Delete"
]
}

To edit custom roles details:

  1. In the Role page click the hamburger icon next to the applicable custom role.
  2. Click Edit.
  3. Update the applicable details in the Edit Role page.
  4. Click Save.

To delete a custom role:

  1. Click the hamburger icon next to the applicable custom role.
  2. Click Delete.

Frequently Asked Questions (FAQs)

  1. What roles are assigned when a user signs up to the organization via CloudSpend?
    • When a user signs up to the organization via CloudSpend, they are automatically onboarded as both an OrgAdmin and a Cost Administrator in CloudSpend.
  2. What roles are assigned to a user upon signing up to the organization or CloudSpend?
    • When a user signs up to the organization, they are automatically onboarded as an OrgAdmin to the organization. However, when the same user signs up directly to CloudSpend, they are onboarded as a Cost Administrator by default and the user will be holding the role of OrgAdmin and Cost Administrator.
  3. What happens when a user accepts an email invitation to join CloudSpend?
    • When a user accepts an email invitation to join CloudSpend, they are onboarded with the role assigned by the Cost Administrator of the organization.
  4. Who can assign or modify user roles within CloudSpend?
    • Only users with the role of Cost Administrator have the ability to assign or modify roles within CloudSpend.
  5. What are the different roles in CloudSpend and what are their permissions?
    • Cost Administrator: Has full access, including the permissions to add, modify, or delete AWS accounts, business units, budgets, and users. But when an existing user is promoted to a Cost Administrator role, it gives all the privileges of an administrator except the one to add new users.
    • Cost User:Has only read-only access.
  6. Can the roles of users be changed after they have been assigned?
    • Yes, the roles of users can be changed by a Cost Administrator at any time after they have been assigned.
  7. Can a user have multiple roles in CloudSpend?
    • No, a user can only have one role at a time in CloudSpend. But, their role can be changed by a Cost Administrator as needed.
      When a user signs up to the organization, they are automatically onboarded as an OrgAdmin to the organization. However, when the same user signs up directly to CloudSpend, they are onboarded as a Cost Administrator by default and the user will be holding the role of OrgAdmin and Cost Administrator.

©2024, Zoho Corporation Pvt. Ltd. All Rights Reserved.

Top
Back to Top