Privacy Settings
(Privacy Settings can be viewed and modified only by privileged administrators.)
Password Manager Pro provides enhanced security options to its users while generating canned reports and exporting files from Password Manager Pro in the below two ways:
- Privacy controls
- Encrypted exports
1. Privacy Controls
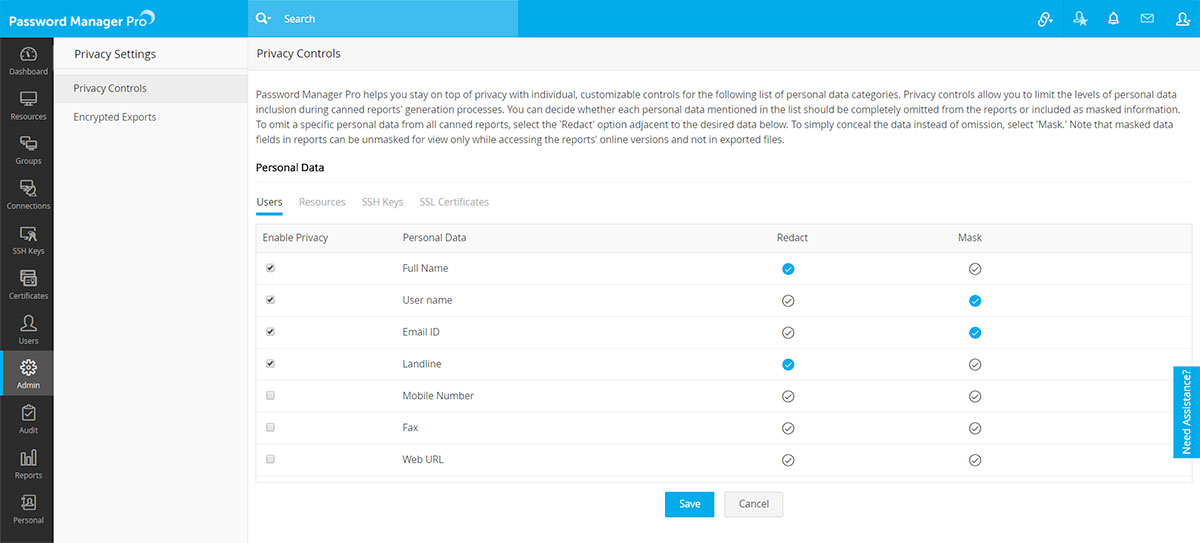
To enhance privacy within the product, Password Manager Pro helps you customize and control the inclusion of personal data in canned reports' generation processes. Canned reports are preformatted reports generated by Password Manager Pro that are available to users for visual analysis. You can decide whether each personal data input in Password Manager Pro should go as masked entries in the reports or be completely removed from them.
To format the inclusion of personal data in the reports, follow the below steps.
- Navigate to Admin >> Settings >> Privacy Settings >> Privacy Controls.
- You'll find four categories with all their respective data listed under Personal Data column.
- Select the checkbox(es) under Enable Privacy column for all the data you want to be masked or redacted from the reports.
- If you select Redact adjacent to the selected data, Password Manager Pro will omit the data completely from all canned reports. You can choose this option for the data you don't want to be generated in the reports.
- If you select Mask adjacent to the selected data, Password Manager Pro will simply mask the data in the reports. The data will be denoted by asterisks in the reports generated. Note that masked data in the reports can be unmasked for view by clicking them while accessing the reports' online versions.
- Once you have made the necessary choices, click Save.

- You can generate a canned report and test the visibility of the selected personal data in it by navigating to Reports and generating a canned report of your choice.
- You'll notice that the data you chose to be redacted has not been generated in the report, and the data you chose to be masked has been denoted by asterisks. You can click on the masked data in order to view them. However, they'll remain masked when you export the report as a PDF or an XLS file.
Note: This feature is available only for generating canned reports and not for custom or query reports.
2. Encrypted Exports
In order to protect all the exported files across Password Manager Pro with a password, you can either set a single password which will be uniformly used for all export operations or allow the users to set their own passwords for the files they export. In order to do so, please follow the steps below:
- Navigate to Admin >> Settings >> Privacy Settings >> Encrypted Exports.
- Select the checkbox for "Enable automatic encryption of all exports from Resources, Groups, Audit, and Reports." This will enable you to set a common password for all the exported files in two ways.
- Manually specify a passphrase: You can choose this option to manually enter a passphrase for encrypting your files.
- Use the password of an account stored in Password Manager Pro: You can choose this field to select the password of any account added in Password Manager Pro, by choosing the respective resource and the corresponding account from the drop-down menu. Using the password of a stored account will enable you to define password policies, effect regular resets, and also maintain password history for export operations.
- In addition, you can also allow the users to set their own passphrase for encrypting an exported file by choosing the checkbox for Allow users to supply their own passphrase.
- Click Save.
Important note:
- Enabling encryption for exports will apply only to the following export operations:
- Resources and resource groups export to XLS file
- Audit export to PDF and CSV files
- Reports export to PDF and XLS files
The option to export resources and resources groups as an encrypted HTML file is excluded here since HTML file encryption is a default setting in Password Manager Pro, unlike the aforementioned export operations which are not password protected by default.
- Encrypted exports setting applies only for users' enterprise resources and not their personal data stored under the Personal tab. Files exported from the personal section in Password Manager Pro will instead be protected with the passphrase that the user supplied earlier to be used as their exclusive encryption key.
3. Export settings for individual users
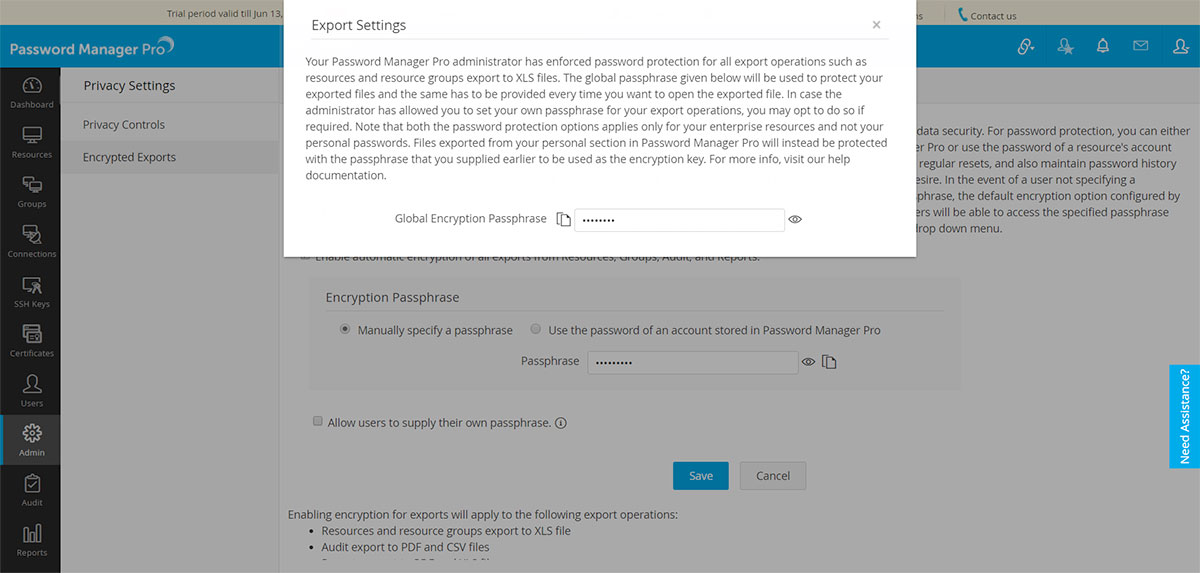
- When export encryption is enabled globally, every user can access their individual export settings by clicking the My Profile icon on the top-right corner and selecting Export Settings from the drop-down menu. Based on whether a user has privilege to choose a passphrase of their own or not, a dialog box will open as explained below.
- Scenario 1: If a user hasn't been allowed to use their own passphrase to encrypt the files, a dialog box will open as shown below.

- In this case, the user can simply copy the encryption passphrase provided and use it to open an exported file.
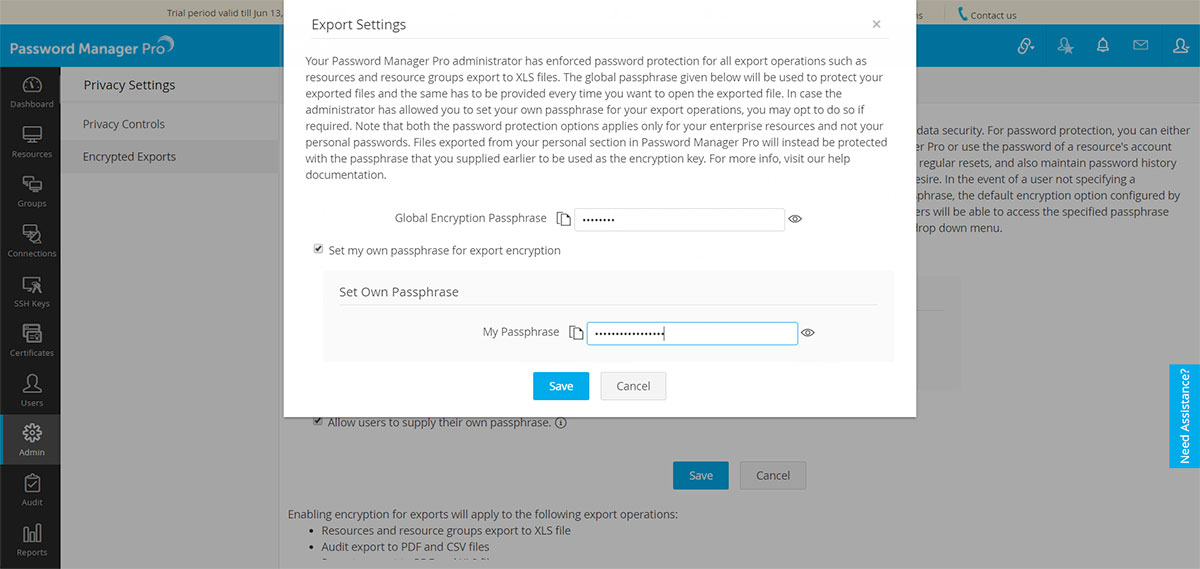
- Scenario 2: If a user is given the privilege of setting a passphrase to encrypt any exported file, a dialog box will open in the UI as shown below.
- Here, the user can choose either to use the global passphrase specified by the administrator, or manually enter a passphrase to encrypt all the exported files.
- In order to enter a password manually, the user should select the checkbox Allow my passphrase to be used for export encryption, and then enter a passphrase manually and click Save. In this case, the passphrase provided by the user will override the passphrase provided by the administrator. If the user chooses not to use this option although it has been provided, then the global encryption option will be enforced to open any exported file.
©2025, ZOHO Corp. All Rights Reserved.

